


New Calibration Software: logiCal
We developed new software which take care of all of the necessary calibration of TVLogic monitors, which includes monitor control, probe control.
Choice:
New Calibration Software: 
We developed new software which take care of all of the necessary calibration of TVLogic monitors, which includes monitor control and probe control.
Functions of LogiCal
TVLogic's monitor automatic calibration
It will adjust the monitor color reproduction properly by using logiColor engine. Considering monitors stabilization, there are a couple of options to perform monitor calibration.
Confirmation of the monitor calibration result
You can confirm the evaluation result which was made just after the monitor calibration on the screen, pdf report or html report. Adding to that, you can copy numerical data to be pasted to Excel, or copy shown graphs to the clipboard. Evaluation only function without calibration is planned to be added in near future.
Create and use of White Matching Parameter with other monitor
If you have a mastering monitor which white is your standard and want to match that white, LogiCal will provide you easy and accurate method for it.
Sending Created LUTs to the monitor
If you need to go back to previous calibration status, or set up other unit of monitor exactly the same status, you can use this function to upload created LUTs without measuring monitor again.
Monitor Calibration Preparation
To do the monitor calibration of TVLogic monitor by logiCal software, you have to prepare and confirm following things.
1. logiColor supported TVLogic Monitor
You need to have TVLogic monitor which was upgraded to logiColor supported firmware. Please confirm our website.
2. USB Type A cable
To communicate with the monitor, we need USB cable, which both connectors are Type A.
3. Supported Probe
You have to prepare logiCal supported probes to measure the color of the monitor. Currently, Klein K-10/K-10A, Colorimetric Research CR-100, CR-200, ..........
We strongly recommend probe calibration. TVLogic introduced intelligent probe calibration system, ProbeCal. We will introduce probe calibration service in near future.
4. LogiCal software
You can download this software from TVLogic web site. Currently Windows 64bit version only, but we will prepare MacOS version in near future.
Perform Monitor Calibration
Step1.
Please connect the monitor and probe and confirm both connections are valid.

Step2.
If the monitor was successfully connected, the screen turn like right image, serial number is shown and some messages are shown on the right side.
Step3.
Connect your probe
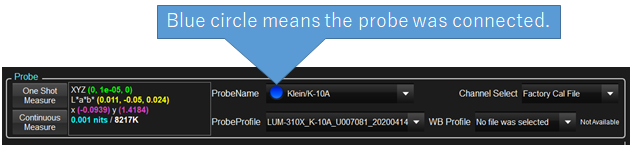
You can confirm the connection by the blue mark on the left of the probe name.
And please confirm the measurement by clicking "Measure" Button on the left of this group.
If you have a proper TVLogic provided ProbeProfile, you can select from the combobox. Or if you are using channel supported probe, select the proper channel.
About the WB profile, we will explain later.
And please confirm the measurement by clicking "Measure" Button on the left of this group.
If you have a proper TVLogic provided ProbeProfile, you can select from the combobox. Or if you are using channel supported probe, select the proper channel.
About the WB profile, we will explain later.
Step4.
Both monitor and probe are connected, you can click "Start Calibration" button, and you will see following menu. (It will change by the program status)
In most of the monitors, the calibration will be done for HDR and SDR, some monitors are SDR only. For HDR supported monitors, you can do calibration by one action both or start from HDR calibration first, and later SDR calibration.
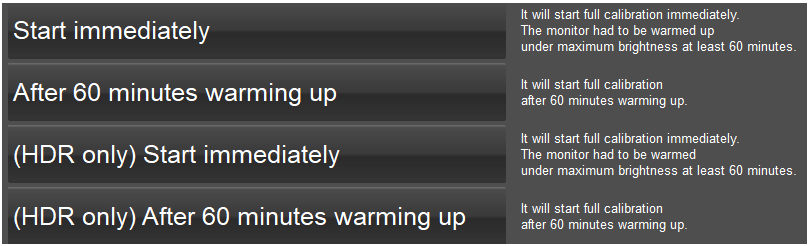
1. Start immediately
It will start full calibration immediately. The monitor had to be warmed up under maximum brightness for designate time. (In this case, 60 minutes)
If you set the monitor to PQ or HLG and spend designated time or more, you can select this menu.
Even if you started the calibration before the monitor stabilization, the software will check the status and automatically re-do the calibration until the stable result was obtained. After you clicked the menu, the right dialog will show up.
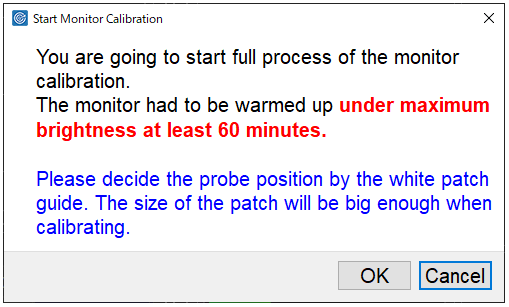
You can confirm what you selected here and if necessary, you can cancel the calibration.
When you selected any menu, similar dialog will show up for your final confirmation.
While this dialog are showing up, monitor will show small triangle in center to assist the setting of the probe. It may look too small but the actual color patch will be big enough for the probe.
If you set the monitor to PQ or HLG and spend designated time or more, you can select this menu.
Even if you started the calibration before the monitor stabilization, the software will check the status and automatically re-do the calibration until the stable result was obtained. After you clicked the menu, the right dialog will show up.
You can confirm what you selected here and if necessary, you can cancel the calibration.
When you selected any menu, similar dialog will show up for your final confirmation.
While this dialog are showing up, monitor will show small triangle in center to assist the setting of the probe. It may look too small but the actual color patch will be big enough for the probe.
2. After 60 minutes warming up
It will start full calibration after designated time of warming up. In this case 60 minutes.
The software will for the period of the time waiting for the monitor stabilization, and automatically start the calibration measurement.
The software will for the period of the time waiting for the monitor stabilization, and automatically start the calibration measurement.
3.(HDR only) Start immediately
It will start full calibration immediately. The monitor had to be warmed up at maximum brightness for designated period of time.
This menu will perform HDR calibration only. You have to do SDR calibration later.(Menu will show up) And it will not check the monitor stabilization status. If the stabilization time is not enough, you may get bad result.
After successfully performed this calibration, you can use PQ or HLG at the brightest backlight setting. Other setting may bring very bad result so please be careful.
4. (HDR only) After 60 minutes warming up
It differs from 3 that before starting calibration, it will wait for the designated time. It is enough time for the stabilization, so you can get good result. But you have to do SDR calibration later.
If you selected 3 or 4, it means HDR only calibration, you can click "Start Calibration" button again and find following menu.
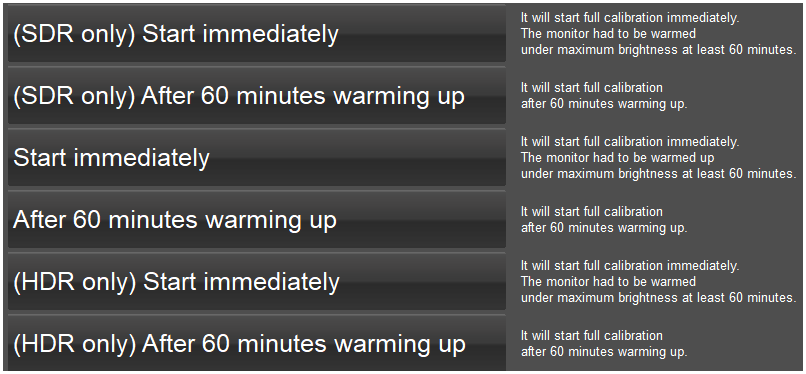
SDR only menus are added. You can add SDR calibration to the previously performed HDR calibration.
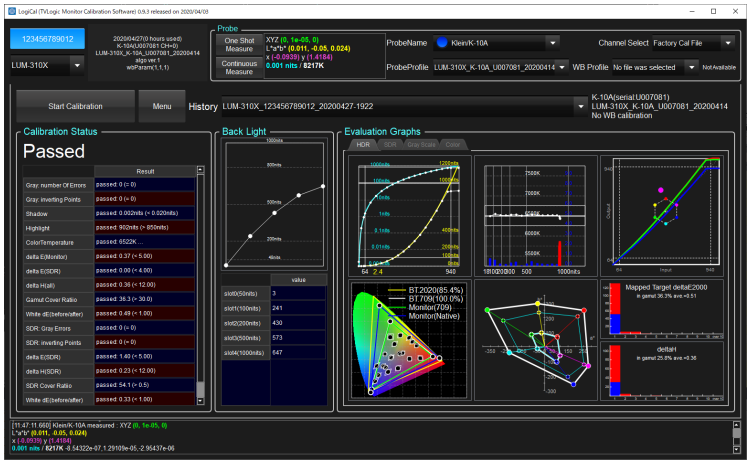
Evaluate Monitor Calibration
1. Checking by numbers and total evaluation result
When the monitor calibration was successfully finished, first thing you should do is confirm the automatic certification of the evaluation result. If it is passed, you will find following left screen. It will check abnormal numbers exists or not for the evaluation result. If it found some error, the screen is on the right below.

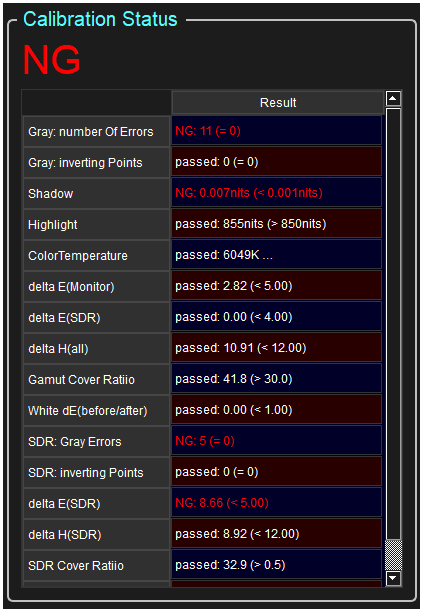
The items which did not meat the criteria, the characters are in red and on the top of this section, "NG" will be shown in red.
The reason why the calibration was failed will be various, but in most cases, physical errors, like, wrong probe position, wrong probe calibration file, wrong probe channel selection, communication error, unsupported firmware, like that. Please confirm everything and try it again.
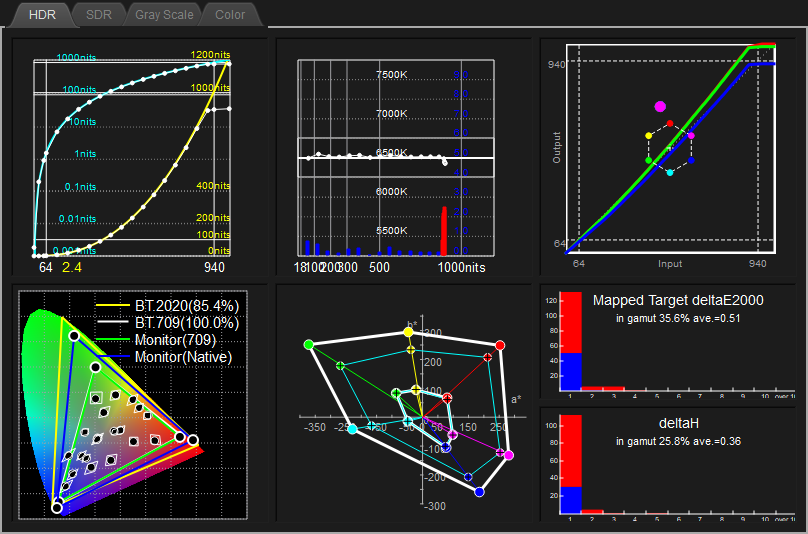
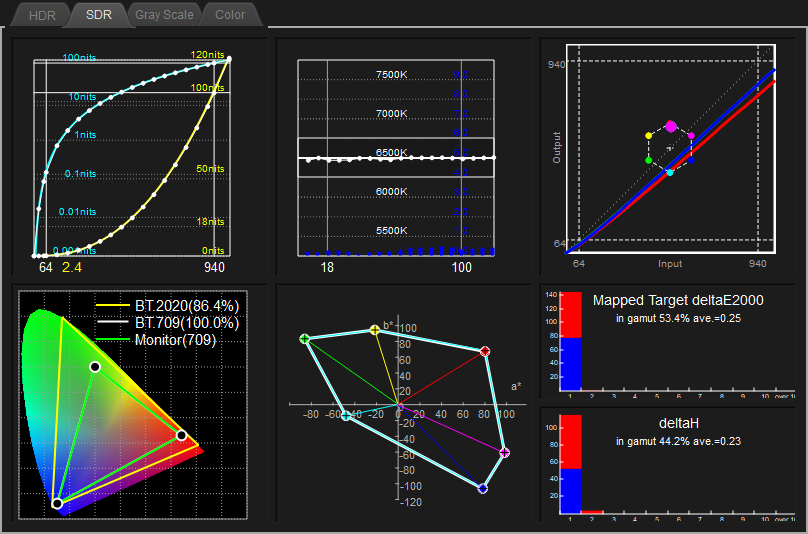
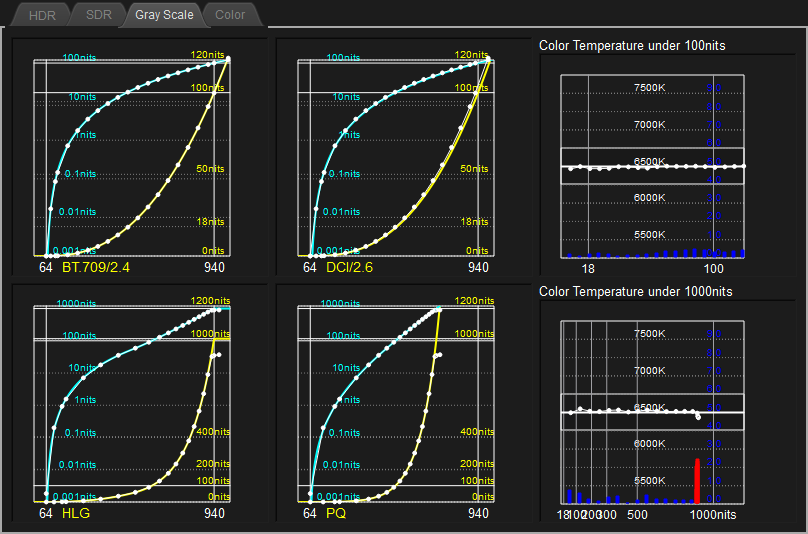
2. Confirming by various graphs
Next you can confirm how accurate the calibration was performed.
You can find graphs with 4 tabs in right side of the screen.
You can find graphs with 4 tabs in right side of the screen.
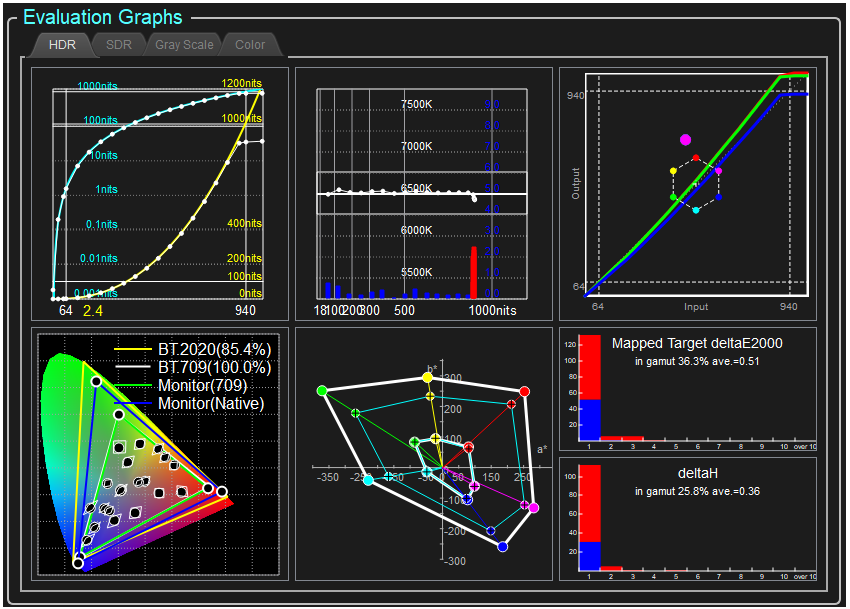
Most of the graphs are common with the report, so you can refer to the explanation of the report.
Other functions
All of the other function can be used from "Menu" button. Clicking menu button triggers to show following popup menu.
Each menu is enabled when it can be used, depending on the connection with the monitor, probe, or status of the loaded data.
Each menu is enabled when it can be used, depending on the connection with the monitor, probe, or status of the loaded data.
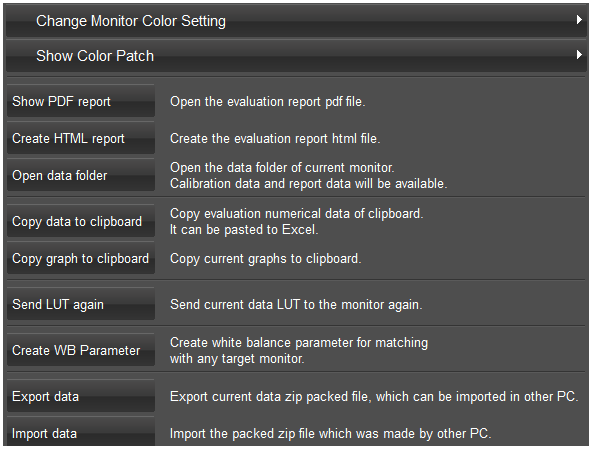
1. Change Monitor Color Setting
You can change monitor color space setting by this menu, like HD, USH, DCI, HLG and PQ. You can change to Bypass mode, which bypasses all of the internal monitor process. Once you used this function, monitor's function buttons are disabled until you disconnect the monitor by clicking top-left button on the main screen.
2. Show Color Patch
You can show the color patch on the monitor. You can select from the preset like white, red, green or blue, or you can directly input 10bit code value for the color of the patch.
3. Show PDF report
It triggers to show the PDF of currently loaded calibration result. This menu is enabled when valid calibration data is loaded.
Example of LUM-310X-CI
Example of LUM-310X-CI
4. Create HTML report
It triggers to create HTML files of currently loaded calibration result. It triggers default browser to show the html and open the folder the file was created. HTML report is useful when you are going to use the result graphs independently. This menu is enabled when valid calibration data is loaded.
5. Open data folder
It triggers to open the folder of the data. Please be careful to delete important data accidentally.
6. Copy data to clipboard
This function is to use evaluation data numerically in Excel. After selecting this menu, you can paste the data to Excel.
You can confirm the example. --> Copy data example
You can confirm the example. --> Copy data example
7. Copy graph to clipboard
This function copies currently showing graphs to the clipboard as image data. It is a easy method to get screen shot of the graphs.

8. Send LUT again
When you need to use previously made calibration, you can use this function. This menu is enabled when valid calibration data is loaded.
9. Create WB Parameter
This menu triggers to show the dialog to make necessary data to do the calibration for the matching white with other monitor. The detailed explanation is here.
10. Export Data
You can create a zip file which contain all of the monitor calibration and evaluation data. This file can be imported to other PC. You can use it for asking support to TVLogic.
Sample data is available at Download Page. --> http://www.tvlogic.tv/new/logical.asp#tab02
Sample data is available at Download Page. --> http://www.tvlogic.tv/new/logical.asp#tab02
11. Import Data
Exported zip file can be imported by this function. You can confirm the calibration result on other PC.
Sample data is available at Download Page. --> http://www.tvlogic.tv/new/logical.asp#tab02
Sample data is available at Download Page. --> http://www.tvlogic.tv/new/logical.asp#tab02
Download of
Software
Software
You can download TVLogic new calibration software logiCAL for free.
This software will upload calibration information to TVLogic server if you connected the PC to internet. The data will be used for customer support and improving monitor calibration quolity. You have to agree to it to use this software.
This software will upload calibration information to TVLogic server if you connected the PC to internet. The data will be used for customer support and improving monitor calibration quolity. You have to agree to it to use this software.
LogiCAL Software
LogiCAL software specifications
| Item | Specification |
|---|---|
| Target OS | Windows10 64bit only (MacOS version will be available soon) |
| Software Display | 1920 x 1080 or larger |
| Supported Monitors | C.I version Firmware Installed |
| Supported Probes | XRite i1pro, i1pro2, i1display OEM version Klein K-10, K-10A Photo Research PR-655/PR-670 Konica Minolta CS-2000 Colormetric Research CR-100, |
| Recommended Probes* (ProbeCAL supported) |
Klein K-10, K-10A |
| Supported Probe Calibration |
1. Selecting of the probe internal channel (K-10, K-10A. CR-100, CR-250) 2. TVLogic Original Probe Calibration: Proprietary very accurate calibration method provided by binary data file with ".probe" suffix. |
| Functions | 1.TVLogic Monitor Calibration 2.Confirmation of the evaluated results by on screen graph, pdf report, hmtl report, numbers in tables in clipboard to be pasted on Excel 3. Creation of the visual matching parameter by the assistance of simple color correction 4. Managing calibrated results: Showing existing evaluation results, sending created calibration parameters. |
| File Input/ Output | Export as zip file, import original format zip file into the system |