


Technical Articles
Article 2 : How to match white color with your monitor?
How to match white color with your monitor?
You may want to match TVLogic monitors to your mastering monitor. In such cases, LogiCAL software provide you a very simple and easy solution.
Waht can you achive?
Suppose you have a mastering monitor and you are using all of other monitors manually adjusting D65 white to the mastering monitor.
Without proper calibration, the D65 white might be able to matched, but color reproduction accuracy is not guaranteed.
My using this method, you can do calibration very accurately and at the same time,
the D65 white of the target monitor can be matched to your mastering monitor.
The limitation of this method is the error which occurs by the combination of the probe and the monitor.
If the probe is XYZ filter type, the error is bigger for measuring high saturation colors.
This method can not remove these errors, so it may remain some differences for primaries when compared with mastering monitor.
To reduce this error, TVLogic provides the method for the probe profiling and calibration. Please contact to your dealer for more detailed information.
General Steps
The procedure is like this.
Step 1.
Prepare mastering monitor and TVLogic monitor you are going to calibrate.
For the mastering monitor, please prepare a method to show D65 white patch on the screen.
Step 2.
Prepare the probe for the measurement.
If you are using TVLogic recommended probes, please prepare probe calibration file if possible.
Step 3.
Connect TVLogic monitor and the probe to your PC.
Step 4.
By clicking "Menu" --> "Create WB Parameter" to show the dialog.
In this dialog, you will adjust the TVLogic monitor so that two monitors white look the same brightness and same color.
In this dialog, you will adjust the TVLogic monitor so that two monitors white look the same brightness and same color.
Step 5.
After matching the colors of two monitors, you have two choices.
One is to create white balance parameter while keeping the brightness result from the probe.
Another is to make the parameters including brightness adjustment.
In this case, you have to know the correct brightness value (nits) of the mastering monitor's white.
Step 6.
Create WB profile file.
Step 7.
Go back to the main screen and click "Start Calibration" button to start the monitor calibration.
Create WB Parameter (step4)
Here is a dialog example to make White Balance parameter at Step 4.
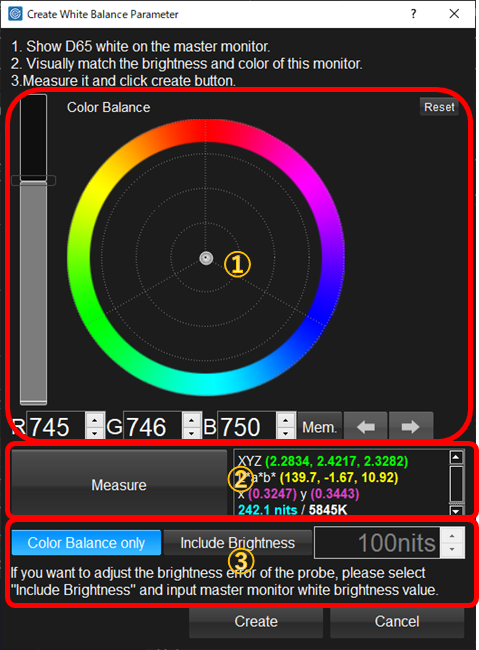
Area1 is the controls to adjust the color of the monitor to match with the mastering monitor.
Fist, adjust the brightness by the slider on the left,
next adjust the white balance with the color wheel.
You can use ↑,↓,←,→ keys to move the position of the ball.
Created code value for the adjustment of the white is shown on the RGB spin boxes below.
You can input them directly.
"Mem" button is to preserve the result temporally.
The preserved data can recall by the "←" button.
Area2 is to do the measurement of the monitor.
After adjusted, just click "Measure" button. The measured result will be shown on the right.
Area3 is to select the adjustment mode.
If your probe is well calibrated and just adjust the visual difference,
please select "Color Balance only".
The parameter is matching the white while trusting the probe measured brightness.
If your probe is not correctly calibrated,
or you want to match the brightness of the mastering monitor indifference of the correct brightness,
you can choose "Include Brightness" mode.
If you selected this, you have to set correct brightness parameter on the right spin box.
It's the nominal brightness of the mastering monitor's white.
If the mastering monitor is BT.709 narrow range, and you are showing RGB=(940, 940, 940),
the value should set to 100nits.
The calibration will adjust the same brightness of the mastering monitor even if the real brightness is not 100nits.
Create WB file and Do Calibration
Finally, you can click "Create" button to create white balance parameter file.
You will find following dialog.
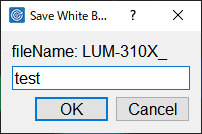
It will decide the file name of the white balance parameter.
The monitor name, "LUM-310X" will be included in the filename automatically.
The monitor name, "LUM-310X" will be included in the filename automatically.
After clicking "OK", the dialog will be closed to show main screen.
Please check the top right of the main screen to confirm the created WB profile was automatically loaded.
Please check the top right of the main screen to confirm the created WB profile was automatically loaded.

The last thing you should do is just start the calibration.
You will get the calibrated monitor with the same white color with the mastering monitor.
You will get the calibrated monitor with the same white color with the mastering monitor.